Friendship Stars is the tutorial I made for my guest post on Sew We Quilt. I decided to post it here on my blog too in case you missed it last month, because it's fun, and well, because I worked hard to write it. hee,hee,hee.
Enjoy!
Friendship Star tablerunner.
I believe everyone is a star with their own light to shine! The Friendship Star block reminds me that we are all brought together by a common love of quilting. In the twenty two years I have been a quilter, I have learned that together quilters light up the world with love, kindness, creativity and their light shines in every quilt they make.
Now thanks to the magic of the internet and blogging, we are are all brought even closer together like one giant quilting guild! Isn't that just the coolest? I decided to teach you not just one block, but to make a project with the Friendship Stars entwined!
So let's get hopp'in!
Ok, so first you will need some fabric! The three fabrics on the left are for my stars. The black is for my tiny inner border and binding and the two fabrics on the right are for my outer border. 1/8" yard of each is plenty. A fat quarter (18" x 22") for the back and a 13" x 21" piece of batting is perfect. The finished size of this project is 12" x 20".
Using your rotary cutter and mat, cut (6) 2 7/8
" squares from your black fabric and (3) 2 1/2" squares. I normally cut a 2 7/8" strip first, cut my six squares and then just trim three squares down to 2 1/2".
Next, you will need (12) 2 7/8" squares from your green fabric.
And (6) 2 7/8" squares from your cream fabric.
Now using a ruler and a pencil, draw a diagonal line on the wrong side of all your green squares. You don't have to make it too dark, just so you can see it.
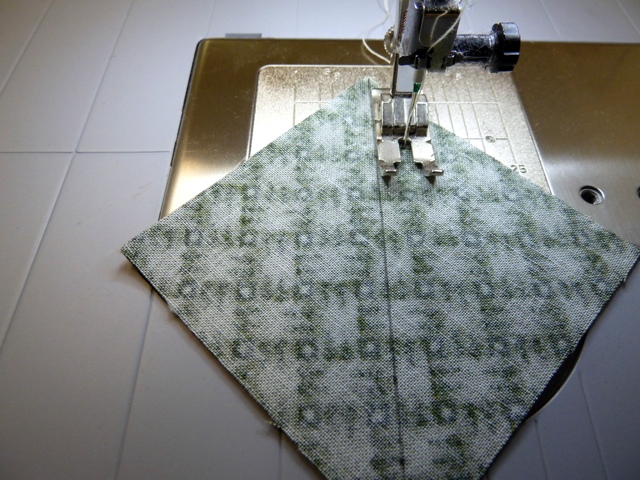
Next place a green square and a black 2 7/8" square right sides together.
Stitch the squares together 1/4" away from the pencil line. My machine has a 1/4" foot, so it's easy.
You will do the same thing with your 2 7/8" cream squares.
I like working in an assembly line, so I just keep feeding them through one behind the other.
Once you have finished stitching down one side of all your squares, turn them around and stitch 1/4" away from the pencil line on the other side. All seams will be 1/4" in this project.
When you are finished stitching, cut them apart on the pencil line. (yes, I use bunny scissors and I
carry them in my shop. I'm a crazy bunny lady after all! hee,hee,hee) You have now easily created two half square triangle pieces. Sweet!
Press all your seams towards the green fabric. Trim all the bunny ears off the corners.
"Hey! Whatcha mean trim bunny ears?"
Ooops sorry Harrington and Hannah! Mama means the fabric ears, not the assistant's ears. Oye...
Lay the squares out like this to create the star block.
Now with right sides together and using 1/4" seam, stitch these squares together.
Next sew the remaining squares together. You will now have three rows.
Press the top row seams in.
Press the middle row seams out and the bottom row seams in.
Now sew your rows together matching up the seams. Voila', you now have a Friendship Star block! Yippee!
Make two more Friendship Star blocks and sew the three of them together. Note: you can also make all your blocks at the same time using the assembly line method. That's what I normally do.
Alrighty then. Let's add the inner border. Sew a 1 1/2" x 18 1/2" black strip to each side of the star set.
Then sew a 1 1/2" x 8 1/2" black strip to the top and bottom. Press all seams towards the black fabric.
Now from your border fabrics, cut a 2 1/2" strip (selvage edge to selvage edge) from each color.
With right sides together, stitch the strips down the long edge. Now cut this strip into (16) 2 1/2" segments. (Note, I don't press them open yet. I find it much easier to cut them into the segments first and then press.)
Next sew 5 segments together for the sides and 3 segments together for the top and bottom. Sew the sides on first. Note the color placement as you sew your borders on.
Well now, all you have left to do is layer your backing and batting with this top, quilt it as you like and apply the binding! Yippee! Happy Bunny Dance!
You now have a 12" x 20" Friendship Star tablerunner! I'm using mine on my coffee table and I'm making some as gifts for friends.
I hope you enjoyed this project. Remember, you are a Star so let your light Shine!
Hugs and Friends always,


24 comments:
I really love this little runner - I am just gonna have to make one soon as I get back into my room. I have missed my room. Thanks, Shell. Judy C
Thanks for the tute, Shell! Your star table runner is adorable. I think I'll put one together after I finish my giveaway gifts this week!
Hugs to you and the bunns...
xoox
Donna and Tag
Great Tutorial Shell! I love how the tablerunner looks like it is twisting.
Lovely tablerunner Shell!I hope the bunnies are behaving LOL.
Oh, Shell - This table runner is DARLING!! And it's obvious that you and your assistants put a lot of work into the tutorial!! Thank you so much!! Your'e the best!! Kris
Shell, I just love, love, love this runner!! My fav color is green and with the rust and cream it is just rich looking! Great job and thanks for telling us how to make our own!! Have a great day!!
Hi Bunnies!!
Beautiful, Shell!
When are you coming to M'ville for a visit?
I really like the way it looks like these blocks are woven together. And, I suppose its disrespectful to say, but Hannah looks like a bean bag bun in that picture!
You are so talented and creative. I love seeing your blog pop up in reader. I never know what I am going to find, but ALWAYS smile when I see it - this runner is just so cool!
PS. Toby (the Minx cat) and Beauregard (the doxy) are my sewing companions - but they don't seem as helpful as yours :)
The table runner is awesome. Thank you for the greattutorial, I have to make one myself.
I love this tablerunner. The colours are fabulous. Love the friendship star block. Hugs,
great tutorial... a relatively simple block making a lovely tablerunner.... I love the fabrics you chose...
Hugz
Cute table runner. I love the friendship star pattern. Thank you for the tutorial. Will have to add this to my list of projects! Nola
Hi Shell, I will see how long blogger is going to be nice to me. I have been having problems leaving messages and doing a post. I would love to make a table runner like yours, but I am trying to get everything done at work because a week from tomorrow we are headed to Branson. We are going to see some shows and just get a way from everything for a few days. We are cool in the evenings and mornings, It is truly beautiful weather. The color is getting so pretty in our area. Take care. Your Missouri Friend.
Great tutorial for a great block and I love the resulting runner , thanks .hugs
I loved this at Madam Samm's and so glad you put it up for us on your site.
Mary Beth
WOW Shell. That is lovely but it sure looks like an awful lot of work! (Both to make and to write up.) I'm sorry I missed it at Madame Samm's but thanks for sharing!
Love the colors! Can appreciate the tutorial ... wow so much work! I dont think i could do it.
I have always loved this pattern but never saw it set like this before. Fabulous - as are the fabrics you used. Can you tell us the source of the fabrics? I especially love the small print black one which would be fabulous in Lynn Wilder's Madrigal which is next on my create list.
A GREAT tutorial, Shell! May I use your pic to link on my blog? I'd love to add you to my next post! This is so pretty, and fast and easy, a great Christmas gift! Thank you dear girl!
I like this tablerunner. Easy to make block. Some lovely fabrics. With a few xmassy fabrics i might just be able to make one in time for xmas. THank you for the idea !
Thanks for this design and tutorial. I bought some black fabric to use for this, I was going to change color combination for mine but I love it the way it is so I hope to make a similar one soon.
thankyou Shell,i cant wait to make this project
Friendship star is one of my favourite blocks...and it looks fantastic three in a row on a table runner...thanks for sharing...
Post a Comment